Ero sivun ”Windows Deployment Services/en” versioiden välillä
(Ak: Uusi sivu: == Add boot image ==) |
(Ak: Uusi sivu: #Select '''Boot Image''' with the right mouse button and press '''Add Boot Image''' #Select the location of the boot image. For this you can extract a Windows ISO file and get the...) |
||
| Rivi 58: | Rivi 58: | ||
== Add boot image == | == Add boot image == | ||
| − | # | + | #Select '''Boot Image''' with the right mouse button and press '''Add Boot Image''' |
| − | # | + | #Select the location of the boot image. For this you can extract a Windows ISO file and get the boot.win file. |
| − | # | + | #Define a name for the image. |
| − | # | + | #Before continuing, make sure you defined everything right. |
| − | #Boot | + | #Boot Image has been successfully created. |
Versio 25. elokuuta 2015 kello 08.40
Windows Deployment Services (WDS) enables installing operating systems from your local network. WDS requires you to have Active Directory Domain Service, DHCP Server and DNS Server. The BIOS of the client machine the operating system is going to be installed on must support and have enabled network (PxE) booting.
Sisällysluettelo
Installation
Install the WDS role from Server Manager.
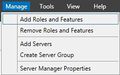
- Begin installation Manage -> Add Roles and Features
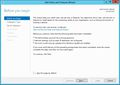
- Read Before you begin and select NEXT
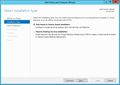
- We select Role-based or Feature-based installation and install the WDS role on one server.
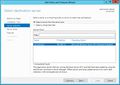
- We select the server the role is to be installed on.
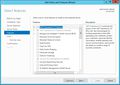
- We select the WDS role.
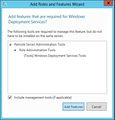
- Select Add Feature, the role's control panel is now enabled.
- We skip the Feature tab, NEXT
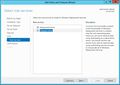
- Read the description of the WDS role.
- We select all the features of the WDS role.
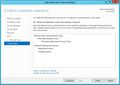
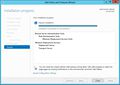
- Confirm installation INSTALL
- The role is now installed.
1
2
3
4
6
7

8
9
10
11


Configuration
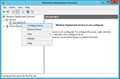
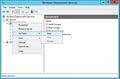
- Open Windows Deployment Services from the Server Manager. Using the right mouse button, select Configure Server from the list.
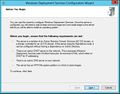
- Read before continuing.
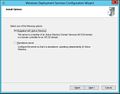
- Select how to install WDS: * Integrated in Active Directory Domain Service * Standalone Server
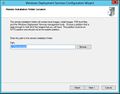
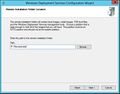
- Select where the WDS server is to be installed. It must be an NTFS partition and can not be a system partition.
- For instance on the root of the R drive.
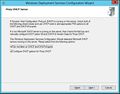
- Define Proxy DHCP server
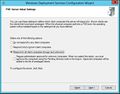
- Define who is allowed to use the WDS service
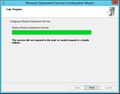
- Installing service
- If you encountered an error, start the service manually.
1
2
3
4
5
6
7
8
9
10


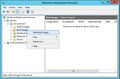
Add boot image
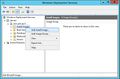
- Select Boot Image with the right mouse button and press Add Boot Image
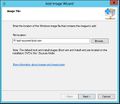
- Select the location of the boot image. For this you can extract a Windows ISO file and get the boot.win file.
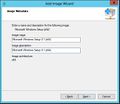
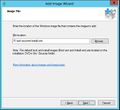
- Define a name for the image.
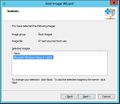
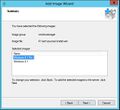
- Before continuing, make sure you defined everything right.
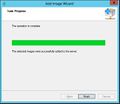
- Boot Image has been successfully created.
1
2
3
4
5


Lisää asennus image
- Valitse hiiren kaksoispainikkeella Add Install Image
- Valitse imagen sijainti. Tämä on puretusta Windows iso tiedostossa install.wim niminen tiedosto.
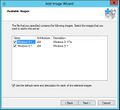
- Valitse imaget jotka lisätään WDS palvelimeen
- Vahvista muutokset
1
2
3
4


Muokkaa WDS:n käynnistysvalikkoa
Vaihdetaan WDS:n käynnistysvalikko kolmannenosapuolen käynnistysvalikkoon. Käytämme Syslinuxia.
WDS palvelu on asennettu D:\RemoteInstall hakemiston alle.
1. Lataa ja pura syslinux asennustiedosto.
2. Kopioi com\vesamenu32.c32 ja com32\modules\chain.c32 tiedostot D:\RemoteInstall\Boot\x64 ja D:\RemoteInstall\Boot\x86 hakemistojen alle.
3. Kopioi core\pxelinux.0 tiedosto WDS palvelimen, D:\RemoteInstall\Boot\x64 ja D:\RemoteInstall\Boot\x64 hakemistojeen ja muuta molemmissa hakemistoissa pxelinux0 nimeksi pxelinux.com. Kannattaa varmuuskopioida vanha tiedosto.
4. D:\RemoteInstall\Boot\x64 ja D:\RemoteInstall\Boot\x86 hakemistossa kopioi pxeboot.n12 ja uudelleennimeä se pxeboot.0:ksi.
5. D:\RemoteInstall\Boot\x64 ja D:\RemoteInstall\Boot\x86 hakemistossa kopioi abortpxe.com ja uudelleennimeä se abortpxe.0:ksi.
6. Konfiguroi WDS:n käyttämään pxelinux.com bootti tiedostoa, tämä tehdään komentorivillä:
WDSUTIL /Set-Server /BootProgram:boot\x86\pxelinux.com /Architecture:x86

WDSUTIL /Set-Server /N12BootProgram:boot\x86\pxelinux.com /Architecture:x86

WDSUTIL /Set-Server /BootProgram:boot\x64\pxelinux.com /Architecture:x64

WDSUTIL /Set-Server /N12BootProgram:boot\x64\pxelinux.com /Architecture:x64
7. Luo D:\RemoteInstall\Boot\x64 ja D:\RemoteInstall\Boot\x86 hakemistoihin kansio nimeltään pxelinux.cfg.
8. Luo pxelinux.cfg kansion alle tiedosto nimetään default (ei tiedostopäätettä).
9. Avaa tiedosto default ja kirjoita tiedostoon:
DEFAULT      vesamenu.c32
PROMPT       0
NOESCAPE     0
ALLOWOPTIONS 0
# Timeout in units of 1/10 s
TIMEOUT 300
MENU WIDTH 40
MENU MARGIN 0
MENU ROWS 12
MENU TIMEOUTROW 14
MENU HSHIFT 5
MENU VSHIFT 2
MENU COLOR BORDER 30;44       #00000000 #00000000 none
MENU COLOR TABMSG 1;36;44     #00000000 #00000000 none
MENU COLOR TITLE 1;36;44     #00000000 #00000000 none
MENU COLOR SEL   30;47       #40000000 #20ffffff
MENU TITLE PXE Boot menu
MENU WIDTH 80
MENU MARGIN 18
MENU ROWS 4
LABEL wds
 MENU       DEFAULT
# MENU PASSWD P@ssw0rd
 MENU       LABEL Windows Deployment Services
 KERNEL     pxeboot.0
LABEL local
 MENU LABEL Boot from Harddisk
 LOCALBOOT 0
LABEL Abort
 MENU LABEL AbortPXE
 KERNEL     abortpxe.0
Lähteet
http://www.deployvista.com/Home/tabid/36/EntryID/126/language/en-US/Default.aspx