Ero sivun ”Mysql/en” versioiden välillä
(Ak: Uusi sivu: You can create a new user account with the command:) |
(Ak: Uusi sivu: == Sources ==) |
||
| (30 välissä olevaa versiota samalta käyttäjältä ei näytetä) | |||
| Rivi 43: | Rivi 43: | ||
=== User Accounts === | === User Accounts === | ||
| + | |||
| + | List user accounts: | ||
| + | |||
| + | select host, user, password from mysql.user; | ||
| + | |||
You can create a new user account with the command: | You can create a new user account with the command: | ||
| Rivi 48: | Rivi 53: | ||
CREATE USER 'newuser'@'localhost' IDENTIFIED BY 'password'; | CREATE USER 'newuser'@'localhost' IDENTIFIED BY 'password'; | ||
| − | + | Give privileges for the new user account. The following command gives pretty much all privileges except the ones for modifying user accounts. | |
GRANT ALL PRIVILEGES ON * . * TO 'newuser'@'localhost'; | GRANT ALL PRIVILEGES ON * . * TO 'newuser'@'localhost'; | ||
| − | + | This command gives the user all privileges including databases and users accounts. | |
GRANT ALL PRIVILEGES ON * . * TO 'newuser'@'%' WITH GRANT OPTION; | GRANT ALL PRIVILEGES ON * . * TO 'newuser'@'%' WITH GRANT OPTION; | ||
| − | + | Confirm privileges: | |
FLUSH PRIVILEGES; | FLUSH PRIVILEGES; | ||
| − | + | Add certain privileges to a user account: | |
GRANT [type of permission] ON [database name].[table name] TO ‘[username]’@'localhost’; | GRANT [type of permission] ON [database name].[table name] TO ‘[username]’@'localhost’; | ||
| − | + | Remove certain privileges from a user account: | |
REVOKE [type of permission] ON [database name].[table name] FROM ‘[username]’@‘localhost’; | REVOKE [type of permission] ON [database name].[table name] FROM ‘[username]’@‘localhost’; | ||
| − | + | Remove user account: | |
DROP USER ‘demo’@‘localhost’; | DROP USER ‘demo’@‘localhost’; | ||
| − | == Master | + | == Master and Slave == |
| − | MySQL | + | Asynchronous synchronization of a MySQL server from Master server to Slave servers. |
=== Master === | === Master === | ||
| − | + | This goes in the Master server's configuration: | |
nano /etc/mysql/my.cnf | nano /etc/mysql/my.cnf | ||
| − | + | Add these to the end of mysqld | |
[mysqld] | [mysqld] | ||
| Rivi 91: | Rivi 96: | ||
auto_increment_offset = 1 | auto_increment_offset = 1 | ||
| − | + | Form connection to MySQL server: | |
mysql -u root -p | mysql -u root -p | ||
| − | + | We create the user account replicant, with login rights from wherever % and password is just "password" | |
create user replicant@'%' identified by 'password'; | create user replicant@'%' identified by 'password'; | ||
| − | + | Define privileges for the user: | |
GRANT SELECT, PROCESS, FILE, SUPER, REPLICATION CLIENT, REPLICATION SLAVE, RELOAD ON *.* TO replicant@'%'; | GRANT SELECT, PROCESS, FILE, SUPER, REPLICATION CLIENT, REPLICATION SLAVE, RELOAD ON *.* TO replicant@'%'; | ||
| Rivi 106: | Rivi 111: | ||
=== Slave === | === Slave === | ||
| − | + | This goes in the Slave server's configuration: | |
| − | + | Establish a connection to the database server and give the Master server's IP-address, username and password. | |
HANGE MASTER TO | HANGE MASTER TO | ||
| Rivi 115: | Rivi 120: | ||
MASTER_PASSWORD='password'; | MASTER_PASSWORD='password'; | ||
| − | + | Start the Slave server | |
Start slave; | Start slave; | ||
| − | + | Make sure that everything works: | |
show slave status\G | show slave status\G | ||
| − | + | When synchronizing both ways, you must define the role for both servers, one Slave and one Master. | |
| − | == MYSQL | + | == MYSQL and PHP5 == |
| − | + | You can fetch and send information to the MySQL database using PHP. This is simply done by the command: | |
<?php | <?php | ||
| Rivi 135: | Rivi 140: | ||
?> | ?> | ||
| − | + | Modify this to for example: | |
<?php | <?php | ||
| − | // | + | //Establishing connection to database |
$con = mysqli_connect(127.0.0.1,root,Qwerty123,database); | $con = mysqli_connect(127.0.0.1,root,Qwerty123,database); | ||
| − | // | + | //Closing connection to database |
mysqli_close($con); | mysqli_close($con); | ||
?> | ?> | ||
| − | + | So basically we select the server address, username, password and the database. | |
| − | MySQL | + | Printing from MySQL database: |
<?php | <?php | ||
$con=mysqli_connect("127.0.0.1","root","Qwerty123","database"); | $con=mysqli_connect("127.0.0.1","root","Qwerty123","database"); | ||
if (mysqli_connect_errno()) { | if (mysqli_connect_errno()) { | ||
| − | echo " | + | echo "Connecting failed. " . mysqli_connect_error(); |
} | } | ||
$result = mysqli_query($con,"SELECT * FROM data"); | $result = mysqli_query($con,"SELECT * FROM data"); | ||
| Rivi 161: | Rivi 166: | ||
?> | ?> | ||
| − | + | Note that the database needs to have something written in it in order for you to print from it. | |
| − | + | Save the previous configurations into mysql.php and then for instance write the following in the index.php file: | |
<?php | <?php | ||
| Rivi 169: | Rivi 174: | ||
?> | ?> | ||
| − | + | You have to write this in every php file that will use the database. | |
| − | == | + | == Backup == |
[[Automysqlbackup]] | [[Automysqlbackup]] | ||
| − | == | + | == Sources == |
https://www.digitalocean.com/community/tutorials/how-to-create-a-new-user-and-grant-permissions-in-mysql | https://www.digitalocean.com/community/tutorials/how-to-create-a-new-user-and-grant-permissions-in-mysql | ||
Nykyinen versio 23. marraskuuta 2015 kello 21.10
Mysql is a handy database which is easy to manage using the phpmyadmin application. Using phpmyadmin requires HTTP server software as well for instance Apache2 or Nginx and Php5.
Sisällysluettelo
Installation
aptitude install mysql-server
Give the mysql root user login password in installation. Do not forget the password. You can create more user accounts and change passwords later.
You can also use a mysql database without phpmyadmin but it helps a lot with managing it.
aptitude install mysql-client
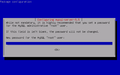
Give password for MySQL server root user
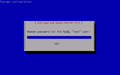
Repeat root user password


MySQL configuration
Configuration file can be found in Ubuntu and Debian under:
/etc/mysql/my.cnf
The port the MySQL server listens to. By default it is set to 3306.
[client]
port 3306
Address the server will listen to. Put a # number sign in front of the line and it will listen to all IP addresses.
bind-address = 127.0.0.1
Command Line
Mysql databases can also be managed by command line.
You can connect to a mysql server with command line by:
mysql -u root -p
Give the mysql root user password.
User Accounts
List user accounts:
select host, user, password from mysql.user;
You can create a new user account with the command:
CREATE USER 'newuser'@'localhost' IDENTIFIED BY 'password';
Give privileges for the new user account. The following command gives pretty much all privileges except the ones for modifying user accounts.
GRANT ALL PRIVILEGES ON * . * TO 'newuser'@'localhost';
This command gives the user all privileges including databases and users accounts.
GRANT ALL PRIVILEGES ON * . * TO 'newuser'@'%' WITH GRANT OPTION;
Confirm privileges:
FLUSH PRIVILEGES;
Add certain privileges to a user account:
GRANT [type of permission] ON [database name].[table name] TO ‘[username]’@'localhost’;
Remove certain privileges from a user account:
REVOKE [type of permission] ON [database name].[table name] FROM ‘[username]’@‘localhost’;
Remove user account:
DROP USER ‘demo’@‘localhost’;
Master and Slave
Asynchronous synchronization of a MySQL server from Master server to Slave servers.
Master
This goes in the Master server's configuration:
nano /etc/mysql/my.cnf
Add these to the end of mysqld
[mysqld]
...
log-bin=mysql-bin
server-id	= 1
auto_increment_increment = 10
auto_increment_offset = 1
Form connection to MySQL server:
mysql -u root -p
We create the user account replicant, with login rights from wherever % and password is just "password"
create user replicant@'%' identified by 'password';
Define privileges for the user:
 GRANT SELECT, PROCESS, FILE, SUPER, REPLICATION CLIENT, REPLICATION SLAVE, RELOAD ON *.* TO replicant@'%';
 Flush Privileges;
Slave
This goes in the Slave server's configuration:
Establish a connection to the database server and give the Master server's IP-address, username and password.
HANGE MASTER TO
MASTER_HOST='10.10.10.100',
MASTER_USER='replicant',
MASTER_PASSWORD='password';
Start the Slave server
Start slave;
Make sure that everything works:
show slave status\G
When synchronizing both ways, you must define the role for both servers, one Slave and one Master.
MYSQL and PHP5
You can fetch and send information to the MySQL database using PHP. This is simply done by the command:
 <?php
 mysqli_connect(host,username,password,dbname);
 mysqli_close($con);
 ?>
Modify this to for example:
 <?php
 //Establishing connection to database
 $con = mysqli_connect(127.0.0.1,root,Qwerty123,database);
 //Closing connection to database
 mysqli_close($con);
 ?>
So basically we select the server address, username, password and the database.
Printing from MySQL database:
 <?php
 $con=mysqli_connect("127.0.0.1","root","Qwerty123","database");
 if (mysqli_connect_errno()) {
 echo "Connecting failed. " . mysqli_connect_error();
 }
 $result = mysqli_query($con,"SELECT * FROM data");
 while($row = mysqli_fetch_array($result)) {
 echo $row['mysql'];
 }
 mysqli_close($con);
 ?>
Note that the database needs to have something written in it in order for you to print from it.
Save the previous configurations into mysql.php and then for instance write the following in the index.php file:
 <?php
 include_once ('mysql.php');
 ?>
You have to write this in every php file that will use the database.