Ero sivun ”Windows 8.1/en” versioiden välillä
(Ak: Uusi sivu: Windows 8.1) |
(Ak: Uusi sivu: Revert changes) |
||
| (23 välissä olevaa versiota samalta käyttäjältä ei näytetä) | |||
| Rivi 1: | Rivi 1: | ||
<languages/> | <languages/> | ||
| − | Windows 8.1 | + | Windows 8.1 is a workstation operating system created by Microsoft. |
| − | == | + | == Creating installation media == |
| − | + | You can download test versions of Windows installation images from Microsoft's own website. You can also download full versions online, but take care to make sure they are genuine. | |
| − | + | For testing purposes you can download Windows 8.1 from the links below. They have a 90 day trial period, after which you can buy a license from Microsoft. | |
| − | [http://www.microsoft.com/en-us/evalcenter/evaluate-windows-8-1-enterprise | + | [http://www.microsoft.com/en-us/evalcenter/evaluate-windows-8-1-enterprise Download Windows 8.1 Enterprise] |
| − | USB | + | When installing windows from a USB flash drive, you can use '''[[USB-Asennus | this]]''' instruction page. |
| − | DVD | + | You can also burn an installation DVD (4,7GB) using common cd burning software. |
| − | == | + | == Bypassing the installation code == |
| − | + | Copy the piece of code below and save it a file called '''ei.cfg''' . Copy the file to %windowsinstallationdir%/source/ | |
[EditionID] | [EditionID] | ||
| Rivi 25: | Rivi 25: | ||
0 | 0 | ||
| − | == Windows 8 | + | == Windows 8 and Windows 8.1 installation codes == |
| − | + | These codes don't activate Windows. | |
Windows 8 Professional | Windows 8 Professional | ||
| Rivi 53: | Rivi 53: | ||
334NH-RXG76-64THK-C7CKG-D3VPT | 334NH-RXG76-64THK-C7CKG-D3VPT | ||
| − | == | + | == Installation == |
| − | # | + | #Boot the computer from the installation media or network boot. |
| − | # | + | #Wait for a moment so the installation files have loaded. |
| − | # | + | #Select installation language, currency and keyboard settings. Click next. |
| − | # | + | #Select '''Install Now'''. |
| − | # | + | #Write the installation code in the text field. |
| − | # | + | #Accept the license. |
| − | # | + | #Select '''Custom: Install Windows Only''', unless you are updating your old operating system and want to carry over files from your old installation. |
| − | # | + | #Select the partition or hard drive which you wish to install Windows to. |
| − | # | + | #Wait for the installation program to finish. The computer will restart automatically a few times. |
| − | # | + | #Give the computer a colour theme and a name. We recommend the pink colour theme. |
| − | # | + | #Select between custom and automatic settings. We recommend to use custom since you can disable some annoying/useless stuff. |
| − | # | + | #Select what network you are in. |
| − | # | + | #Select update settings. |
| − | # | + | #Define how you wish to get help with problems from online. |
| − | # | + | #Define what information you want to share with Microsoft (privacy settings). |
| − | # | + | #Here you can log in to your Microsoft account. This lets you synchronize your MS account with different devices. We will now show you how to create a local account. Select '''Create a new account'''. |
| − | # | + | #Select '''Sign in without a Microsoft account'''. |
| − | # | + | #Enter the local user's username and by recommendation also a password. Select the language and the computer will reboot. |
| − | # | + | #After the computer has rebooted, click the screen. |
| − | # | + | #Give the password for your user account, if you defined one during installation. |
| − | # | + | #Familiarize yourself with the new Metro UI menu. |
| − | # | + | #You can get to the desktop by clicking the Desktop tile. |
<gallery> | <gallery> | ||
| Rivi 97: | Rivi 97: | ||
</gallery> | </gallery> | ||
| − | == | + | == Changing language (Other than Home-version) == |
| − | + | The operating system is now in English and we will change it to Finnish. You can change it to whatever language you wish using the same method. You can only change the language in the Pro version. | |
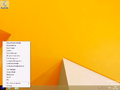
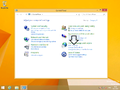
| − | # | + | # Open '''Control Panel''' |
| − | # | + | # Click '''Add language''' |
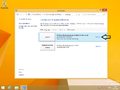
| − | # | + | # Click '''Options''' |
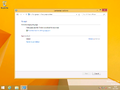
| − | # | + | # Click '''Download and install language pack''' and give administrator confirmation if prompted |
| − | # | + | # Wait for the installation to finish |
| − | + | The language will be changed the next time you log out and back in. | |
<gallery> | <gallery> | ||
| Rivi 118: | Rivi 118: | ||
</gallery> | </gallery> | ||
| − | == | + | == Attaching a PC to a domain (Win8.1 Home -version not applicable) == |
| − | + | Check the settings to confirm that the primary DNS server is set to the same as the Domain Controller DNS server. | |
| − | # | + | # Open '''Control Panel''' |
| − | # | + | # Click '''System and Security''' |
| − | # | + | # Click '''System''' |
| − | # | + | # Click '''Change settings''' |
| − | # | + | # Click '''Change''' |
| − | # | + | # Enter the domain name which the PC will be attached to |
| − | # | + | # Enter the credentials of a user with sufficient privileges to attach the PC to the domain |
| Rivi 140: | Rivi 140: | ||
</gallery> | </gallery> | ||
| − | == BOOTLOADER | + | == BOOTLOADER switch == |
| − | + | The following commands are to be ran in an elevated command prompt. | |
| − | + | Switch Windows 7 BOOTLOADER: | |
bcdedit /set {default} bootmenupolicy legacy | bcdedit /set {default} bootmenupolicy legacy | ||
| − | + | Revert changes | |
bcdedit /set {default} bootmenupolicy standard | bcdedit /set {default} bootmenupolicy standard | ||
Nykyinen versio 21. heinäkuuta 2015 kello 05.50
Windows 8.1 is a workstation operating system created by Microsoft.
Sisällysluettelo
Creating installation media
You can download test versions of Windows installation images from Microsoft's own website. You can also download full versions online, but take care to make sure they are genuine.
For testing purposes you can download Windows 8.1 from the links below. They have a 90 day trial period, after which you can buy a license from Microsoft.
Download Windows 8.1 Enterprise
When installing windows from a USB flash drive, you can use this instruction page.
You can also burn an installation DVD (4,7GB) using common cd burning software.
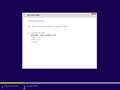
Bypassing the installation code
Copy the piece of code below and save it a file called ei.cfg . Copy the file to %windowsinstallationdir%/source/
 [EditionID]
 Professional
 [channel]
 Retail
 [VL]
 0
Windows 8 and Windows 8.1 installation codes
These codes don't activate Windows.
Windows 8 Professional
XKY4K-2NRWR-8F6P2-448RF-CRYQH
Windows 8 Professional with Media Center
RR3BN-3YY9P-9D7FC-7J4YF-QGJXW ()
Windows 8 Home
FB4WR-32NVD-4RW79-XQFWH-CYQG3
Windows 8.1 Professional
XHQ8N-C3MCJ-RQXB6-WCHYG-C9WKB
Windows 8.1 Professional with Media Center
GBFNG-2X3TC-8R27F-RMKYB-JK7QT
Windows 8.1 Home
334NH-RXG76-64THK-C7CKG-D3VPT
Installation
- Boot the computer from the installation media or network boot.
- Wait for a moment so the installation files have loaded.
- Select installation language, currency and keyboard settings. Click next.
- Select Install Now.
- Write the installation code in the text field.
- Accept the license.
- Select Custom: Install Windows Only, unless you are updating your old operating system and want to carry over files from your old installation.
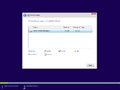
- Select the partition or hard drive which you wish to install Windows to.
- Wait for the installation program to finish. The computer will restart automatically a few times.
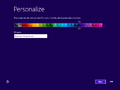
- Give the computer a colour theme and a name. We recommend the pink colour theme.
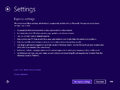
- Select between custom and automatic settings. We recommend to use custom since you can disable some annoying/useless stuff.
- Select what network you are in.
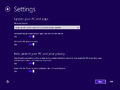
- Select update settings.
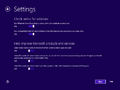
- Define how you wish to get help with problems from online.
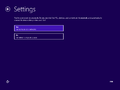
- Define what information you want to share with Microsoft (privacy settings).
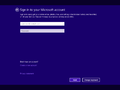
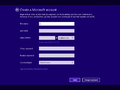
- Here you can log in to your Microsoft account. This lets you synchronize your MS account with different devices. We will now show you how to create a local account. Select Create a new account.
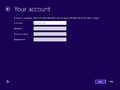
- Select Sign in without a Microsoft account.
- Enter the local user's username and by recommendation also a password. Select the language and the computer will reboot.
- After the computer has rebooted, click the screen.
- Give the password for your user account, if you defined one during installation.
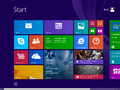
- Familiarize yourself with the new Metro UI menu.
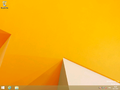
- You can get to the desktop by clicking the Desktop tile.
8.
9.
10.
11.
12.
13.
14.

15.
16.
17.
19.

20.

21.
22.
23.


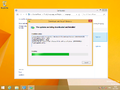
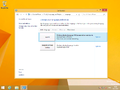
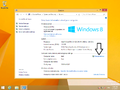
Changing language (Other than Home-version)
The operating system is now in English and we will change it to Finnish. You can change it to whatever language you wish using the same method. You can only change the language in the Pro version.
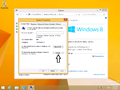
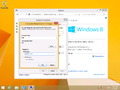
- Open Control Panel
- Click Add language
- Click Options
- Click Download and install language pack and give administrator confirmation if prompted
- Wait for the installation to finish
The language will be changed the next time you log out and back in.
1.
2.
3.
4.
5.


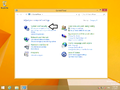
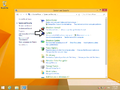
Attaching a PC to a domain (Win8.1 Home -version not applicable)
Check the settings to confirm that the primary DNS server is set to the same as the Domain Controller DNS server.
- Open Control Panel
- Click System and Security
- Click System
- Click Change settings
- Click Change
- Enter the domain name which the PC will be attached to
- Enter the credentials of a user with sufficient privileges to attach the PC to the domain
2.
3.
4.
5.
6.


BOOTLOADER switch
The following commands are to be ran in an elevated command prompt.
Switch Windows 7 BOOTLOADER:
bcdedit /set {default} bootmenupolicy legacy
Revert changes
bcdedit /set {default} bootmenupolicy standard