Ero sivun ”WDS+ADK/en” versioiden välillä
(Ak: Uusi sivu: == Configuration ==) |
|||
| Rivi 35: | Rivi 35: | ||
| − | # | + | #We open the WDS control panel from the metro menu and select the correct server. We notice that the server is not yet configured so we right click on it and select "Configure Server". |
| − | # | + | #Next |
| − | # | + | #We select if the server is part of an active directory or if we use it as a standalone service. In our example case the server itself is the domain controller and we want to integrate the server as part of an active directory. |
| − | # | + | #We select the directory which contains the following: Boot images, Install images, PXE boot files and WDS management tools. In our example we have created a new partition for these. |
| − | # | + | #Check both of these boxes if DHCP is running on the same server as WDS. |
| − | # | + | #We select the scenarios where a client machine can install an operating system from the network. I select that WDS responds to all client machines. |
| − | # | + | #Almost done here. |
| − | # | + | #Note that WDS needsd to be separately started! If you forget to do this you might scratch your head until it bleeds :)! |
| − | # | + | #We add the boot image. |
| − | # | + | #Add the boot.wim file which you want here. You can find it from the sources directory. |
| − | # | + | #Name of the image and additional information here. |
| − | # | + | #End consensus. Check that all of the information is correct. |
| − | # | + | #Done! |
| − | # | + | #We add the installation image now. |
| − | # | + | #We make an image group. In this case the name of the group is "windowsimaget". |
| − | # | + | #Select the install.wim file, it is found in the sources directory just like boot.wim. |
| − | # | + | #We select which images we want to share under this group. We select both of which we have, so Windows 8.1 and Windows 8.1 Pro. |
| − | # | + | #End consensus. Check all information.( |
<gallery> | <gallery> | ||
Nykyinen versio 25. elokuuta 2015 kello 10.46
In this manual we first install WDS (Windows Deployment Service) and after that we install ADK (Windows Assessment and Deployment Kit). They are both useful server tools for automatic and remote software distribution on Windows platforms. Our aim in this goal is to successfully make a fully automatic Windows 8.1 client installation over network. The server's operating system is Windows Server 2012 R2.
Note that WDS needs DHCP service in order to function! You can find information on creating a DHCP server on our wiki DHCP_Server. We also need the installation files of the operating system that is to be installed to the client machine, so in other words the extracted files from the installation disc ISO image file. ADK package is fetched from Microsoft's website.
WDS Installation
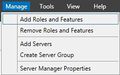
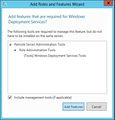
- We begin by going to the server manager and selecting the add roles and features from the dropdown menu on the top right.
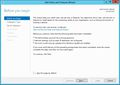
- The installation wizard opens.
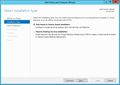
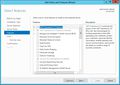
- We select that the service is only installed on one machine.
- We select that we want to select the server from the list.
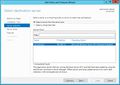
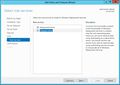
- We select Windows Deployment Service from the list and accept the installation of required additional components.
- Other components are not needed for now.
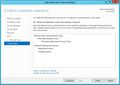
- Some information, bla bla.
- We install both roles.
- Installing...
- Done!
1
2
3
4
5
6

7
8
9
10


Configuration
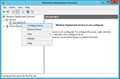
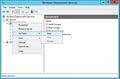
- We open the WDS control panel from the metro menu and select the correct server. We notice that the server is not yet configured so we right click on it and select "Configure Server".
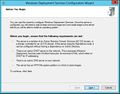
- Next
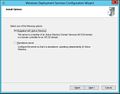
- We select if the server is part of an active directory or if we use it as a standalone service. In our example case the server itself is the domain controller and we want to integrate the server as part of an active directory.
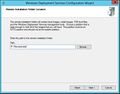
- We select the directory which contains the following: Boot images, Install images, PXE boot files and WDS management tools. In our example we have created a new partition for these.
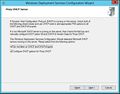
- Check both of these boxes if DHCP is running on the same server as WDS.
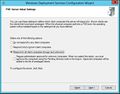
- We select the scenarios where a client machine can install an operating system from the network. I select that WDS responds to all client machines.
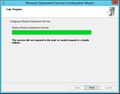
- Almost done here.
- Note that WDS needsd to be separately started! If you forget to do this you might scratch your head until it bleeds :)!
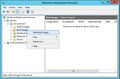
- We add the boot image.
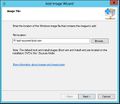
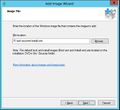
- Add the boot.wim file which you want here. You can find it from the sources directory.
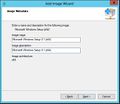
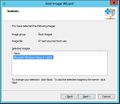
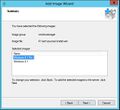
- Name of the image and additional information here.
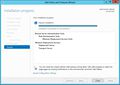
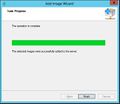
- End consensus. Check that all of the information is correct.
- Done!
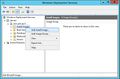
- We add the installation image now.
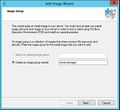
- We make an image group. In this case the name of the group is "windowsimaget".
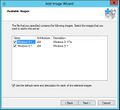
- Select the install.wim file, it is found in the sources directory just like boot.wim.
- We select which images we want to share under this group. We select both of which we have, so Windows 8.1 and Windows 8.1 Pro.
- End consensus. Check all information.(
1
2
3
4
5
6
7
8
9
10
11
12
13
14
15
16
17
18


