Ero sivun ”RouterOS DHCP/en” versioiden välillä
(Ak: Uusi sivu: 2. We create the settings for the new DHCP pool. In the settings we define the default gateway and DNS servers.) |
(Ak: Uusi sivu: 3. We create the DHCP server. Here we define which ports will get their addresses by DHCP and from which pool (we add the pool we just created) as well as lease time (time until an...) |
||
| Rivi 26: | Rivi 26: | ||
</gallery> | </gallery> | ||
| − | 3. | + | 3. We create the DHCP server. Here we define which ports will get their addresses by DHCP and from which pool (we add the pool we just created) as well as lease time (time until an assigned address is released, once the device the address has been given to is disconnected.). |
/ip dhcp-server add name=dhcp-server interface=ether1 lease-time=24:00:00 address-pool=dhcp_pool | /ip dhcp-server add name=dhcp-server interface=ether1 lease-time=24:00:00 address-pool=dhcp_pool | ||
Versio 21. elokuuta 2015 kello 07.31
With DHCP (Dynamic Host Configuration Protocol) it is easy to manage and assign IP-addresses for client devices in your network. Mikrotik RouterOS has DHCP client and DHCP server support.
Sisällysluettelo
DHCP Server
Make sure you have defined a static IP address for the Mikrotik router. In our example we use the 192.168.100.0 /24 network. In Mikrotik we have assigned the first address of the network to be 192.168.100.1 /24. Note, that Mikrotik starts assigning addresses from the address pool's end instead of the start like most DHCP servers.
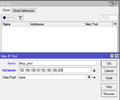
1. We create a DHCP pool. In our example the pool assigns addresses between 192.168.100.10 and 192.167.100.200.
/ip pool add name=dhcp_pool address=192.168.100.10-192.168.100.200
2. We create the settings for the new DHCP pool. In the settings we define the default gateway and DNS servers.
/ip dhcp-server network add address=192.168.100.0/24 gateway=192.168.100.1 netmask=24 dns-server=192.168.100.1
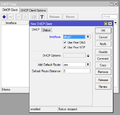
3. We create the DHCP server. Here we define which ports will get their addresses by DHCP and from which pool (we add the pool we just created) as well as lease time (time until an assigned address is released, once the device the address has been given to is disconnected.).
/ip dhcp-server add name=dhcp-server interface=ether1 lease-time=24:00:00 address-pool=dhcp_pool
DHCP varaus
DHCP varauksella voit määrittää DHCP palvelimelle asiakaslaitteen MAC-osoitteen. Kun määritetty MAC-osoite yhdistää verkkoon jossa DHCP palvelin on, tämä antaa ennalta määritetyn IP-osoitteen kyseiselle asiakaslaitteelle.
/ip dhcp-server lease add address=192.168.100.100 mac-address=11:22:33:44:55:66
Mikrotik ja Windows Deployment Services
Tässä esimerkki miten saa Mikrotikin DHCP:n toimimaan WDS:n kanssa. Määritä kuvankaappausten perusteella lisäasetukset DHCP palvelulle.
 Next Server = WDS-palvelimen IP-osoite
 Boot File Name = Tiedosto joka ladataan ensimmäisenä WDS palvelimesta
 DHCP Options = 060 PXEClient
DHCP Client
DHCP Client ominaisuus mahdollistaa Mikrotikin verkkoasetusten hakemisen DHCP palvelimelta.
/ip dhcp-client add interface=ether1 disable=no
- Interface = Portti josta pyydetään DHCP paketit
- disable no = Otetaan käyttöön


