Ero sivun ”Cellmapper/en” versioiden välillä
(Ak: Uusi sivu: You can register an account for the cellmapper application and log in to it easily. Registering an account doesn't take much, just a username, e-mail and password. You can see your...) |
|||
| (89 välissä olevaa versiota 3 käyttäjän tekeminä ei näytetä) | |||
| Rivi 1: | Rivi 1: | ||
<languages/> | <languages/> | ||
| − | |||
| − | Cellmapper does not work on Windows Phone or iOS devices since the software they use prevents using the network API. Part of Cellmappers features require rooting your android. | + | <div style="text-align: center; margin-bottom: 10px; padding: 3px; background-color: #D7DEF9;"> |
| + | [[Cellmapper/en|Guide]] | ||
| + | [[Cellmapper/FAQ/en|FAQ]] | ||
| + | </div> | ||
| + | |||
| + | Cellmapper is a useful application for locating 2G/3G/4G base stations. The application measures the signal strength and other network data collected by the end user and uses the data collected to locate network base stations and their coverage. This information is then collected in the Cellmapper map. The application is supported on Android, Windows Mobile and Blackberry devices although the Android application is the only one that is being actively supported and updated. | ||
| + | |||
| + | Cellmapper's servers calculate the data the users have sent and creates a graphical representation of it in the map delivered by Google Maps, which can be browsed directly from the application or Cellmapper's webpage. The model can not account for certain variables though, so in order to get reliable data one should keep the measuring phone in as clear and unobstructed area as possible. An ideal measuring setting is as unobstructed as possible, such as large fields of prairie, but for instance in cities obstacles are unavoidable. When measuring one should move in 1/2-3/4 circles at different distances around the presumed base station in order to get the most accurate results. | ||
| + | |||
| + | The application supports real time transfer, so the data collected is sent to Cellmapper's servers as you measure. You can also manually send the data after measuring or resend already collected data. After the files have been sent to the server, they are processed within minutes if there is not much load on the servers at the moment. If the servers are under heavy load then processing data can take up to hours or even a full day. The decay of processing speed is a known issue, and will be addressed in the future. | ||
| + | |||
| + | Cellmapper does not work on Windows Phone or iOS devices since the software they use prevents using the network API. Part of Cellmappers features require rooting your android device, but it works fine without that as well. | ||
While using cellmapper, pay attention to: | While using cellmapper, pay attention to: | ||
*Battery consumption rise (looks for GPS signals and checks network quality) | *Battery consumption rise (looks for GPS signals and checks network quality) | ||
| − | *Screen won't turn off while application is running (More battery consumption!) | + | *Screen won't turn off while application is running (More battery consumption!). If you have a phone with an Amoled -screen you can turn it off for the duration of the measuring from the applications settings. |
*Base station location in urban areas is best determined by doing round trips of city blocks. At more rural locations you should do larger sweeps to save time. You will get the best result on flat ground. | *Base station location in urban areas is best determined by doing round trips of city blocks. At more rural locations you should do larger sweeps to save time. You will get the best result on flat ground. | ||
*Ensure that you have a sufficiently good connection to the base station as well as a GPS connection. | *Ensure that you have a sufficiently good connection to the base station as well as a GPS connection. | ||
| + | *Using the application requires that you have a subscription with the operator whose 2G/3G/4G network you are trying to measure. You can only measure stations in the network you are actively connected to, so for instance you can't locate a 4G base station if you are in a 3G network. Usually 2G/3G/4G cells can all be in the same base station, and even be sent from the same panel antenna. | ||
| + | *The application can show that a base station can cover areas up to a hundred kilometers. These errors can be created if the network data collected by the application has great resemblance with some other base station or if the phone has calculated incorrect GPS-data. At this moment these "orphan cells" can't be removed by the user and they are left on the map. | ||
Cellmapper is constantly being developed and the changelogs and devlogs can be found on their webpages: https://www.cellmapper.net/mw/index.php/Feature_Requests | Cellmapper is constantly being developed and the changelogs and devlogs can be found on their webpages: https://www.cellmapper.net/mw/index.php/Feature_Requests | ||
| − | Here is a direct link to their FAQ: https://www.cellmapper.net/mw/index.php/FAQ | + | Here is a direct link to their FAQ and answers: https://www.cellmapper.net/mw/index.php/FAQ |
If you have something to ask about cellmapper, you should contact the developer directly https://plus.google.com/communities/101488064885764774600 | If you have something to ask about cellmapper, you should contact the developer directly https://plus.google.com/communities/101488064885764774600 | ||
| + | '''You can donate money to the Cellmapper project. Using donations they aim to keep the servers running and modern enough to accommodate the growing userbase. Each of their servers costs about 73$CAD (Canadian dollars) upkeep every month.''' | ||
| − | == | + | == Usage == |
1. Download for Android <html><a target="_blank" href="https://play.google.com/store/apps/details?id=cellmapper.net.cellmapper"> Cellmapper </a></html> application. | 1. Download for Android <html><a target="_blank" href="https://play.google.com/store/apps/details?id=cellmapper.net.cellmapper"> Cellmapper </a></html> application. | ||
| Rivi 28: | Rivi 41: | ||
3. Start the application. Ensure that you are connected to the 2G/3G/4G base station that you wish to measure. You need to have a data plan / contract with the operator, whose connection you wish to measure. | 3. Start the application. Ensure that you are connected to the 2G/3G/4G base station that you wish to measure. You need to have a data plan / contract with the operator, whose connection you wish to measure. | ||
| − | [[Tiedosto:Screenshot_2015-05-25-15-53-57.png|400px]] | + | [[Tiedosto:Screenshot_2015-05-25-15-53-57.png|400px|left]] |
| + | |||
| + | [[File:Screenshot_2015-09-23-09-07-23.png|400px]] | ||
In the Cell List tab you can see if GPS has been connected properly ('''GPS OK''') as well as your base stations information. | In the Cell List tab you can see if GPS has been connected properly ('''GPS OK''') as well as your base stations information. | ||
| − | In the picture we have connected to "Cell | + | In the picture we have connected to "Cell 555" base station in Elisa's LTE network. GPS has determined location by 3 meters accuracy and 0 out of 0 satellites have been connected to (they were connected to, but some bug made it appear they had not been connected to). Login OK means that I have also logged myself in to the Cellmapper application. By logging in to the application your username will be shown in the Cellmapper map (internet browser map). |
{| class="wikitable" | {| class="wikitable" | ||
|- | |- | ||
| − | ! | + | ! Abbreviation !! Explanation !! Example |
|- | |- | ||
| − | | Cell || Cell ID, this is used to differentiate | + | | Cell || Cell ID, this is used to differentiate cells from each other || Cell 141047 |
|- | |- | ||
| − | | Sector || The sector number of | + | | Sector || The sector number of a cell || Sector 21 |
| + | |- | ||
| + | | MCC (Mobile Country Code) || The mobile network country-specific code || 244 (Finland) | ||
| + | |- | ||
| + | | MNC (Mobile Network Code) || Operator-specific mobile network code || 5 (Elisa), 12 (DNA), 91 (Sonera) | ||
| + | |- | ||
| + | |LTE Cell Global Identify (CGI ) | ||
| + | |Base station ID, used to differentiate base stations from each other | ||
| + | |36108053 | ||
| + | |- | ||
| + | | LTE Reference Signal Received Quality (RSRQ )|| Quality of received signal || -6dB | ||
| + | |- | ||
| + | | LTE Signal to Noise Ratio (SINR - Signal-to-interference-plus-noise ratio) || The scale of the SINR measurements are between -20 and +30dB, the bigger the better. Signal strength is though of as "OK" when it is 15dB or over that, the maximum speed is then 50Mbps. You will need roughly 25dB if you wish to reach speeds around 100Mbps. All speed estimations are made using the 20Mhz bandwidth.|| 28dB | ||
| + | |- | ||
| + | | LTE Reference Signal Recieved Power (RSRP ) || Interprets the quality of the incoming reference signal. -50dBm is the best, -90dBm is good and -110dBm is weak. When the signal is better than -90dBm we can follow the SINR value alone.|| -65dBm | ||
| + | |- | ||
| + | | LTE Received Signal Strength Indicator (RSSI) || Interprets the strength of the incoming radio signal. || -51dBm | ||
| + | |- | ||
| + | |UMTS RNC-ID | ||
| + | | | ||
| + | |5 | ||
| + | |- | ||
| + | | TAC (Tracking Area Code) || Tells the area code consisting of multiple base stations. || 4050 | ||
| + | |- | ||
| + | |LAC (Local Area Code) | ||
| + | | Tells the area code consisting of multiple base stations. | ||
| + | |5005 | ||
| + | |} | ||
| + | |||
| + | The way information is shown here will depend on different phone models. This screenshot has been taken using a Samsung S3 4G I9305. | ||
| + | |||
| + | Here is some additional information if you are using a newer model phone or API 4.2. You can ask for more information from our taistowiki community or in our [http://murobbs.muropaketti.com/threads/cellmapper-cellular-tower-map.1237362/ murobbs] thread, murobbs is in Finnish only. | ||
| + | |||
| + | {| class="wikitable" | ||
|- | |- | ||
| − | + | ! Abbreviation !! Explanation !! Example | |
|- | |- | ||
| − | | | + | | LTE Phycical Cell Identify (PCI) || Only shown in an LTE network || |
|- | |- | ||
| − | | | + | | UMTS Primacy Scrambling Code (PSC) || Only shown in a 3G network|| |
|- | |- | ||
| − | | | + | | Channel Quality Indicator || || |
| + | |- | ||
| + | | Cell Identify || Same as Cell Physical Identify|| | ||
|- | |- | ||
| − | | | + | | Data Source Delay || || 00.006 |
|- | |- | ||
| − | | | + | |Data Source || || oem_ril |
|} | |} | ||
| − | + | For more information on signal values: [[Mobiiliverkkotekniikka#Tietoa_signaaliarvoista]] | |
| + | |||
| + | === Map Guide === | ||
| + | |||
| + | The map opens from the left side menu. | ||
[[Tiedosto:Screenshot_2015-05-25-15-54-27.png|400px]] | [[Tiedosto:Screenshot_2015-05-25-15-54-27.png|400px]] | ||
| − | In the maps tab you can see the location of already mapped base stations. The application will automatically only show the base stations of the current network (LTE in the picture). The location of base stations can also be viewed from the <html><a href="http://www.cellmapper.net/map"> Cellmapper webmap</a>. | + | In the maps tab you can see the location of already mapped base stations. The application will automatically only show the base stations of the current network being used (LTE in the picture). The location of base stations can also be viewed from the <html><a href="http://www.cellmapper.net/map"> Cellmapper webmap</a></html>. |
| − | The base station is marked on the map as a red dot in mobile and a red arrow in a browser. By clicking on the base station you can see it's range as a black zone. Light green indicates best signal quality, dark green good quality, black average quality and red the weakest signal quality. | + | The base station is marked on the map as a red dot in mobile and a red arrow in a browser. A blue dot refers to your own location and the black line tells you which station you are connected to. By clicking on the base station you can see it's range as a black zone. Light green indicates best signal quality, dark green good quality, black average quality and red the weakest signal quality. |
[[Tiedosto:Screenshot 2015-05-25-15-56-16.png|400px]] | [[Tiedosto:Screenshot 2015-05-25-15-56-16.png|400px]] | ||
| − | + | By pressing '''Select Provider''' you can switch the operator and network so you can inspect base stations of other networks. | |
| − | |||
| − | By pressing '''Select Provider''' you can switch the operator and network you | ||
Put a tick into '''Record Data''' so that you measurements will be collected for uploading. | Put a tick into '''Record Data''' so that you measurements will be collected for uploading. | ||
| Rivi 73: | Rivi 125: | ||
[[Tiedosto:Screenshot_2015-05-25-15-55-15.png|400px]] | [[Tiedosto:Screenshot_2015-05-25-15-55-15.png|400px]] | ||
| + | === Send data to server === | ||
5. Upload your recorded data to the Cellmapper server by opening the '''Cell List''' tab and '''Upload and Statistics''' tab. You should always upload your newly measured base station so that somebody else won't have to go and redo it, and they can instead view it from the map. The cellmapper map is updated nearly instantaneously . | 5. Upload your recorded data to the Cellmapper server by opening the '''Cell List''' tab and '''Upload and Statistics''' tab. You should always upload your newly measured base station so that somebody else won't have to go and redo it, and they can instead view it from the map. The cellmapper map is updated nearly instantaneously . | ||
| Rivi 84: | Rivi 137: | ||
[[Tiedosto:Screenshot_2015-05-25-15-54-35.png|400px]] | [[Tiedosto:Screenshot_2015-05-25-15-54-35.png|400px]] | ||
| + | |||
| + | === Resend data to server === | ||
| + | |||
| + | Load the data to Cellmapper servers by selecting '''Upload and Statistics''' from the menu. | ||
| + | |||
| + | [[File:Screenshot_2015-08-25-21-27-13.png|400px]] | ||
| + | |||
| + | Open the menu and select '''Re-Upload'''. | ||
| + | |||
| + | [[File:Screenshot_2015-08-25-21-27-42.png|400px]] | ||
| + | |||
| + | Select the starting date and time of which the data will be reuploaded. | ||
| + | |||
| + | [[File:Screenshot_2015-08-25-21-27-53.png|400px]] | ||
| + | |||
| + | Select the end date and time of which the data will be reuploaded. | ||
| + | Now when you press OK the phone will start to send data collected from between the starting and end date to the server, if an internet connection is available. Depending on the amount of data you have to send the process could take anything from a few seconds to a few minutes. | ||
== Settings == | == Settings == | ||
| − | == Automatic data upload == | + | === Automatic data upload === |
| − | This enables the cellmapper application to automatically transmit data to the cellmapper servers that you have collected of a base station. | + | This enables the cellmapper application to automatically transmit data to the cellmapper servers that you have collected of a base station. |
Open the application settings and put a tick in '''Enable Instant Upload'''. | Open the application settings and put a tick in '''Enable Instant Upload'''. | ||
[[File:Screenshot_2015-05-25-15-54-06.png|400px]] | [[File:Screenshot_2015-05-25-15-54-06.png|400px]] | ||
| + | |||
| + | === Show base stations on the map === | ||
| + | |||
| + | This function shows base stations on the map. By default this feature is enabled. | ||
| + | |||
| + | === Show inaccurate base stations === | ||
| + | |||
| + | This feature shows inaccurately measured base stations on the map. Inaccurate base stations are stations which only have one cell or stations that have not been measured properly due to low signal values. You can improve the accuracy by measuring the station in closer proximity to it. Other overlapping base stations can also be inaccurately measured automatically as you are trying to measure some other station. You can also make a station accurate by manually locating it correctly on the map. This feature is disabled by default. | ||
| + | |||
| + | === Android Cell ID API 4.2 === | ||
| + | |||
| + | This feature only works in Android 4.2 and Cell ID API 4.2 supported devices. Most manufacturers (such as Google) do no support this feature, so it is unlikely that your device will. Although, many new Samsung, LG and Sony devices support this feature. OnePlusOne gives incorrect information when measuring 3G, but the 2G and LTE network measuring works fine. | ||
| + | |||
| + | When you're using API 4.2 on your phone, wait a moment before beginning measurements. The phone will not immediately show correct data as the application is booted, but a short (2-10seconds) wait will correct this. | ||
| + | |||
| + | Check if your device supports this feature: https://www.cellmapper.net/mw/index.php/Android_4.2_CellID_Support | ||
| + | |||
| + | You can test the feature to see if it works correctly on your device. This requires restarting the application. | ||
| + | |||
| + | API 4.2 advantages: | ||
| + | |||
| + | * Enables turning off your screen during measuring | ||
| + | * Enables measuring and logging several cells at the same time from the same operator's network. This method can have some hiccups and bugs, so most stations measured this way will be shown as inaccurate base stations. | ||
| + | |||
| + | [[Tiedosto:Screenshot 2015-08-05-22-34-14.png|400px]] | ||
| + | |||
| + | === Check GPS age === | ||
| + | |||
| + | This feature checks that your GPS information is fresh. We recommend enabling this. | ||
=== Frequencies === | === Frequencies === | ||
| − | Cellmapper can measure the frequencies | + | Cellmapper can measure the mobile network frequencies with the Samsung / Sony field test mode. This feature requires root privileges, so you need to root your phone if you wish to use this feature ('''NOTE!''' this removes any warranty on your phone.) After you have rooted your phone you go to Cellmapper's settings and enable '''Read logcat for Samsung/Sony Field Test Data'''. Sonera's and DNA's LTE frequencies are automatically updated on the browser map, so you won't need this feature if you are measuring their networks. Elisa's LTE is not able to do this, so they can only be measured with rooted Samsung/Sony devices. Support for this feature is also being developed for different devices. The feature will not work in custom roms. To test this you can "dial" '''*#0011#''' (samsung only) and that will show you the Band number. In Finland we mainly use LTE band 20 (800Mhz) and 3 (1800Mhz) and 7 in city areas (2600Mhz). |
| + | |||
| + | Instructions for Samsung devices: | ||
| + | # Ensure that your device is rooted and SuperSU is functional | ||
| + | # Enable '''Read logcat for Samsung/Sony Field Test data''' from Cellmapper's settings | ||
| + | # Close the application and reopen it | ||
| + | # When you open the Cellmapper application it will also open Service Mode. Do not shut this down! When measuring, the service mode must be shown on the screen (do not shutdown/lock your screen) or you can also use Dual Window mode. Otherwise service mode can't read the frequencies. If Service Mode does not open automatically, you can open it manually by dialing '''*#0011#'''. Frequency information will be shown for a short time when moving from Service Mode to Cellmapper's home view. When the frequency information dissappears, Cellmapper won't measure any more. Frequency information will be visible again once you enter Service Mode. | ||
[[Tiedosto:Screenshot 2015-07-11-16-22-45.png|400px]] | [[Tiedosto:Screenshot 2015-07-11-16-22-45.png|400px]] | ||
| + | |||
| + | Below is the view from Cellmapper's main page when the application is reading Samsung ServiceMode's information. | ||
| + | |||
| + | [[File:Screenshot_2015-09-29-17-05-49.png|400px]] | ||
Operator's LTE sectors and corresponding frequencies. | Operator's LTE sectors and corresponding frequencies. | ||
| Rivi 111: | Rivi 220: | ||
| DNA || 10, 20, 30, 40 || 800Mhz || | | DNA || 10, 20, 30, 40 || 800Mhz || | ||
|- | |- | ||
| − | | Elisa || 1, 2, 3 || 800Mhz / 1800Mhz || | + | | Elisa || 1, 2, 3 || 800Mhz / 1800Mhz || |
| + | |- | ||
| + | | Elisa || 4, 5, 6 || 2600Mhz || | ||
|- | |- | ||
| Sonera || 11, 21, 31 || 1800Mhz || | | Sonera || 11, 21, 31 || 1800Mhz || | ||
| Rivi 117: | Rivi 228: | ||
| Sonera || 12, 22, 32 || 800Mhz || | | Sonera || 12, 22, 32 || 800Mhz || | ||
|- | |- | ||
| − | | Sonera | + | | Sonera || 10, 20, 30 || 2600Mhz || |
| + | |- | ||
| + | | Sonera and DNA || 13 || 800Mhz || Shared network | ||
| + | |- | ||
| + | | Sonera and DNA || 23, 33 || 1800Mhz || Shared network | ||
|} | |} | ||
| Rivi 128: | Rivi 243: | ||
[[Tiedosto:Screenshot 2015-05-25-15-55-05.png|400px]] | [[Tiedosto:Screenshot 2015-05-25-15-55-05.png|400px]] | ||
| − | == | + | == Web browser map == |
| − | + | You can easily access the cellmapper web map using your browser at https://www.cellmapper.net/map | |
| − | + | From the left you can select Country, Provider/Operator and Network. | |
[[Tiedosto:Celllmapper map 1.png|800px]] | [[Tiedosto:Celllmapper map 1.png|800px]] | ||
| − | + | After filling those in the map will load already mapped stations found by your criteria. We selected Finland, Sonera and LTE and took a glance at the Turku map. | |
[[Tiedosto:Celllmapper map 2.png|800px]] | [[Tiedosto:Celllmapper map 2.png|800px]] | ||
| − | + | From the menu on the left you can select which frequencies are shown by clicking bands. This feature works only if the providers network allows measuring them, such as Sonera LTE and DNA LTE. You can also select '''Show low Accuracy Towers''' to see more base stations. These stations are either inaccurate and can only have one or two cells. Also weakly measured stations won't be shown without this filter, until they have been measured more accurately. | |
| − | + | By the colours you can see the signal strength. Light green means good connection and dark green OK connection. Red means really shitty connection. If there's black it means there is no connection at all. | |
[[Tiedosto:Celllmapper map 3.png|800px]] | [[Tiedosto:Celllmapper map 3.png|800px]] | ||
| − | + | Click on a base station to get more information about it. On the left for instance you can see when it was first and last measured, the best signal established to a cell (RSPR) and the frequency, if available. Most commonly base stations have three cells which point off to different directions. If a base station is marked in the wrong place on the map and you know the correct and precise location, you can move the base station by logging in under '''Edit Site Data''' and pressing '''Click here to log in'''. Username and password are the same as in the cellmapper application, so this requires registration. | |
| + | |||
| + | In Extra Data you can write more information about the base station in question or other things. You can also attach a picture of the station if you so desire. Credentials to do this should be sought out from the cellmapper community. | ||
| + | |||
| + | === Moving and Removing base stations on the map === | ||
| + | |||
| + | "Only for advanced users who understand how this works. '''Move only LTE base stations, don't move 2G/3G base stations!''' You can also message Taistowiki support and we can do this for you. Removing or moving base stations without knowledge on how this is done will only create more issues." | ||
| + | |||
| + | Log in to Cellmapper using your map credentials (not Cellmapper wiki or forum credentials) [https://www.cellmapper.net/login here]. If you don't have the credentials, you can register [https://www.cellmapper.net/register here]. If you have forgotten your password, you can reset it [https://www.cellmapper.net/reset here]. | ||
| + | |||
| + | [[File:Cellmapper_map_login_1.png|400px]] | ||
| + | |||
| + | Once you have successfully logged in, the page will inform you that the Login was successful. After this return to the map [https://www.cellmapper.net/map here]. | ||
| + | |||
| + | Moving base stations has no sensible manual as of now, but just remember '''common sense''' while doing it as well as the following tips: | ||
| + | |||
| + | * From satellite imagery on services such as google maps try to locate the base stations in the vicinity. | ||
| + | * Take a look at the mast map http://testi.jles.me/mastot/ (this map only shows masts in Finland) | ||
| + | |||
| + | After this take a look at how the base station's cells cover. 800Mhz naturally covers a larger area than 1800Mhz, but the coverage will not be larger than 20km away. Watch out for "orphan cells", there could be incorrect data. | ||
| + | |||
| + | * Click the base station and look at it's coverage | ||
| + | * Look at the RSRP values, which are the maximums. The smallest is usually the most reliable one and also the direction of the cell. | ||
| + | |||
| + | Example: To the South of Mikkeli there is the place Harjunmaa with the base station eNB ID 142530. Using Cellmapper some user has measured in the middle of highway 13, but we want to move it to the correct and accurate location. | ||
| + | |||
| + | [[File:Cellmapper_map_move_tower_1.png|400px]] | ||
| + | |||
| + | One route to take is to directly inspect satellite images of the area but it takes less effort to look at the mast map and see where in the area there are masts. | ||
| + | |||
| + | [[File:Cellmapper_map_move_tower_2.png|400px]] | ||
| + | |||
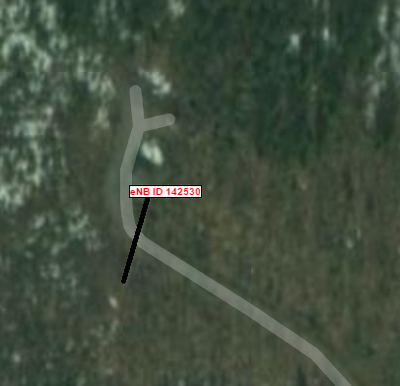
| + | This particular case is easy since there is only one mast in the area so we can presume it is the mast in question. We recommend also using the satellite map so you can see what kind of terrain the area is made of. When we zoom in on the masts map and Cellmapper's map to the same location we can also clearly see the mast. We use the mouse and drag the mast location from the roadside to this location. | ||
| + | |||
| + | [[File:Cellmapper_map_move_tower_3.png|400px]] [[File:Cellmapper_map_move_tower_4.png|400px]] | ||
| + | |||
| + | The page will ask you "Are you sure you would like to movie site 142530 to 61.866220238889255,26.98739254474674?". Confirm this action '''OK''' if the mast is on the right spot. Wait for a moment until you get the "Update Succesfull" message. If you encountered and error, try logging out and back in again. If you still encounter an error, clear your browser cookies and cache and then retry. Still can't do it? Contact support. | ||
| − | + | Now the base station has been moved and Cellmapper starts to generate the coverage area of the base station. This will take some time depending on how crowded the station is at the time. | |
| − | == | + | Link to this area: http://www.cellmapper.net/map?MCC=244&MNC=91&type=LTE&latitude=61.86903288943261&longitude=26.993256093446345&zoom=15 |
| − | + | You can remove base stations with the '''Delete tower''' button. The base station will be hidden from the map but it will appear again if it is measured at a later time. | |
| − | + | Here is an example of incorrect data, we recommend that only experienced Cellmapper users who can successfully identify incorrect data remove any stations. | |
| − | + | [[File:Cellmapper_map_delete_wrong_data_1.png|400px]] | |
| − | |||
| − | [[ | + | [[Category:Mobiiliverkko]] |
| + | [[Category:2G]] | ||
| + | [[Category:3G]] | ||
| + | [[Category:4G]] | ||
| + | [[Category:LTE]] | ||
Nykyinen versio 6. lokakuuta 2015 kello 14.43
Cellmapper is a useful application for locating 2G/3G/4G base stations. The application measures the signal strength and other network data collected by the end user and uses the data collected to locate network base stations and their coverage. This information is then collected in the Cellmapper map. The application is supported on Android, Windows Mobile and Blackberry devices although the Android application is the only one that is being actively supported and updated.
Cellmapper's servers calculate the data the users have sent and creates a graphical representation of it in the map delivered by Google Maps, which can be browsed directly from the application or Cellmapper's webpage. The model can not account for certain variables though, so in order to get reliable data one should keep the measuring phone in as clear and unobstructed area as possible. An ideal measuring setting is as unobstructed as possible, such as large fields of prairie, but for instance in cities obstacles are unavoidable. When measuring one should move in 1/2-3/4 circles at different distances around the presumed base station in order to get the most accurate results.
The application supports real time transfer, so the data collected is sent to Cellmapper's servers as you measure. You can also manually send the data after measuring or resend already collected data. After the files have been sent to the server, they are processed within minutes if there is not much load on the servers at the moment. If the servers are under heavy load then processing data can take up to hours or even a full day. The decay of processing speed is a known issue, and will be addressed in the future.
Cellmapper does not work on Windows Phone or iOS devices since the software they use prevents using the network API. Part of Cellmappers features require rooting your android device, but it works fine without that as well.
While using cellmapper, pay attention to:
- Battery consumption rise (looks for GPS signals and checks network quality)
- Screen won't turn off while application is running (More battery consumption!). If you have a phone with an Amoled -screen you can turn it off for the duration of the measuring from the applications settings.
- Base station location in urban areas is best determined by doing round trips of city blocks. At more rural locations you should do larger sweeps to save time. You will get the best result on flat ground.
- Ensure that you have a sufficiently good connection to the base station as well as a GPS connection.
- Using the application requires that you have a subscription with the operator whose 2G/3G/4G network you are trying to measure. You can only measure stations in the network you are actively connected to, so for instance you can't locate a 4G base station if you are in a 3G network. Usually 2G/3G/4G cells can all be in the same base station, and even be sent from the same panel antenna.
- The application can show that a base station can cover areas up to a hundred kilometers. These errors can be created if the network data collected by the application has great resemblance with some other base station or if the phone has calculated incorrect GPS-data. At this moment these "orphan cells" can't be removed by the user and they are left on the map.
Cellmapper is constantly being developed and the changelogs and devlogs can be found on their webpages: https://www.cellmapper.net/mw/index.php/Feature_Requests
Here is a direct link to their FAQ and answers: https://www.cellmapper.net/mw/index.php/FAQ
If you have something to ask about cellmapper, you should contact the developer directly https://plus.google.com/communities/101488064885764774600
You can donate money to the Cellmapper project. Using donations they aim to keep the servers running and modern enough to accommodate the growing userbase. Each of their servers costs about 73$CAD (Canadian dollars) upkeep every month.
Sisällysluettelo
Usage
1. Download for Android Cellmapper application.
2. Enable GPS (not Google's location service)
Location services can be enabled in Samsung devices in : Settings -> Location services -> Use GPS satellites
3. Start the application. Ensure that you are connected to the 2G/3G/4G base station that you wish to measure. You need to have a data plan / contract with the operator, whose connection you wish to measure.
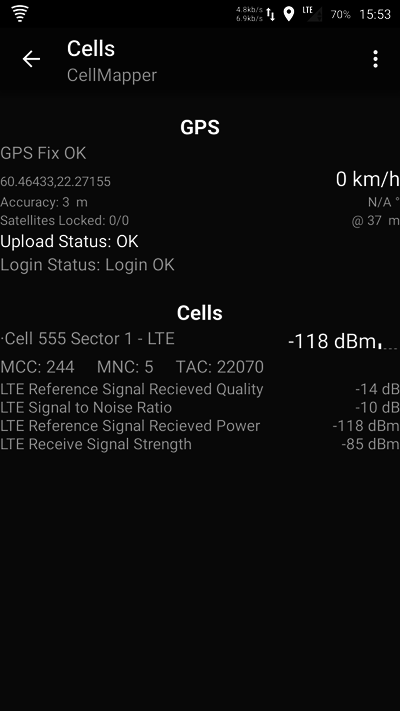
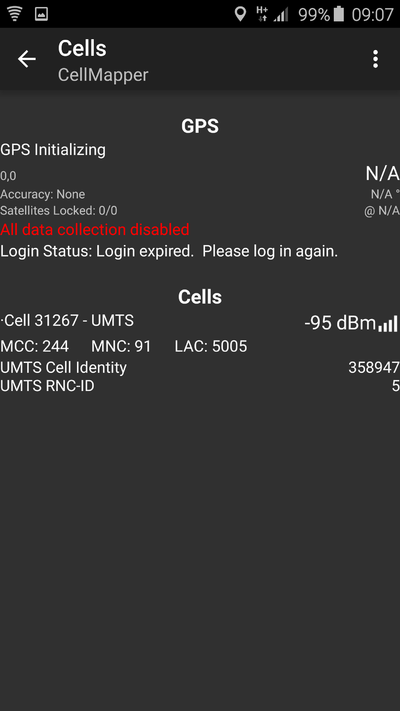
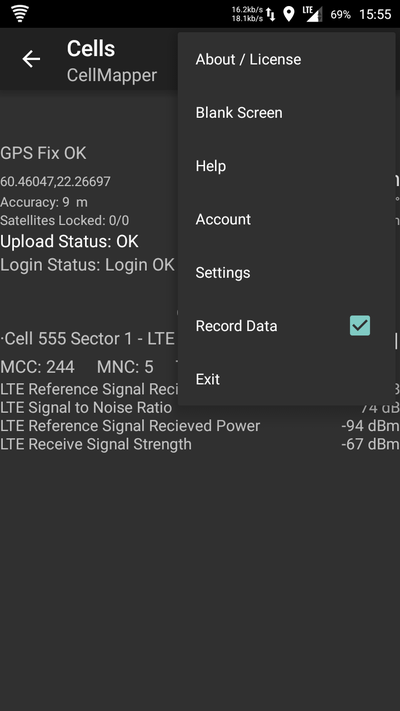
In the Cell List tab you can see if GPS has been connected properly (GPS OK) as well as your base stations information.
In the picture we have connected to "Cell 555" base station in Elisa's LTE network. GPS has determined location by 3 meters accuracy and 0 out of 0 satellites have been connected to (they were connected to, but some bug made it appear they had not been connected to). Login OK means that I have also logged myself in to the Cellmapper application. By logging in to the application your username will be shown in the Cellmapper map (internet browser map).
| Abbreviation | Explanation | Example |
|---|---|---|
| Cell | Cell ID, this is used to differentiate cells from each other | Cell 141047 |
| Sector | The sector number of a cell | Sector 21 |
| MCC (Mobile Country Code) | The mobile network country-specific code | 244 (Finland) |
| MNC (Mobile Network Code) | Operator-specific mobile network code | 5 (Elisa), 12 (DNA), 91 (Sonera) |
| LTE Cell Global Identify (CGI ) | Base station ID, used to differentiate base stations from each other | 36108053 |
| LTE Reference Signal Received Quality (RSRQ ) | Quality of received signal | -6dB |
| LTE Signal to Noise Ratio (SINR - Signal-to-interference-plus-noise ratio) | The scale of the SINR measurements are between -20 and +30dB, the bigger the better. Signal strength is though of as "OK" when it is 15dB or over that, the maximum speed is then 50Mbps. You will need roughly 25dB if you wish to reach speeds around 100Mbps. All speed estimations are made using the 20Mhz bandwidth. | 28dB |
| LTE Reference Signal Recieved Power (RSRP ) | Interprets the quality of the incoming reference signal. -50dBm is the best, -90dBm is good and -110dBm is weak. When the signal is better than -90dBm we can follow the SINR value alone. | -65dBm |
| LTE Received Signal Strength Indicator (RSSI) | Interprets the strength of the incoming radio signal. | -51dBm |
| UMTS RNC-ID | 5 | |
| TAC (Tracking Area Code) | Tells the area code consisting of multiple base stations. | 4050 |
| LAC (Local Area Code) | Tells the area code consisting of multiple base stations. | 5005 |
The way information is shown here will depend on different phone models. This screenshot has been taken using a Samsung S3 4G I9305.
Here is some additional information if you are using a newer model phone or API 4.2. You can ask for more information from our taistowiki community or in our murobbs thread, murobbs is in Finnish only.
| Abbreviation | Explanation | Example |
|---|---|---|
| LTE Phycical Cell Identify (PCI) | Only shown in an LTE network | |
| UMTS Primacy Scrambling Code (PSC) | Only shown in a 3G network | |
| Channel Quality Indicator | ||
| Cell Identify | Same as Cell Physical Identify | |
| Data Source Delay | 00.006 | |
| Data Source | oem_ril |
For more information on signal values: Mobiiliverkkotekniikka#Tietoa_signaaliarvoista
Map Guide
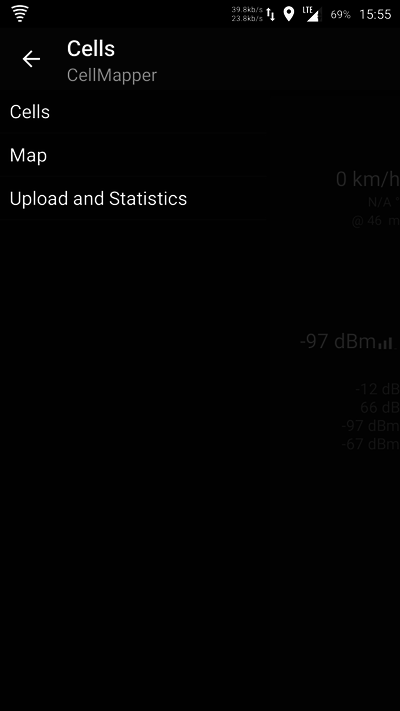
The map opens from the left side menu.
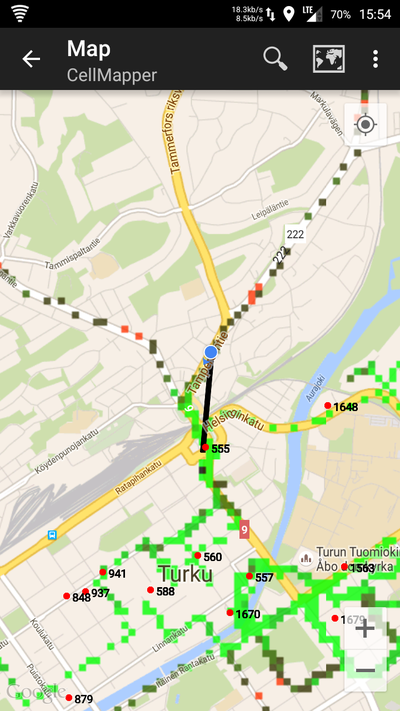
In the maps tab you can see the location of already mapped base stations. The application will automatically only show the base stations of the current network being used (LTE in the picture). The location of base stations can also be viewed from the Cellmapper webmap.
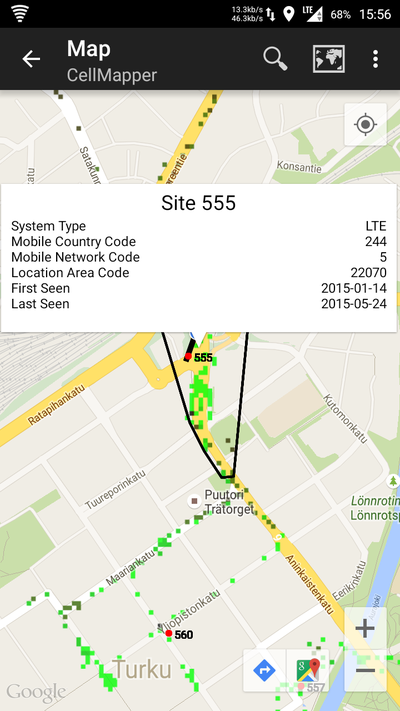
The base station is marked on the map as a red dot in mobile and a red arrow in a browser. A blue dot refers to your own location and the black line tells you which station you are connected to. By clicking on the base station you can see it's range as a black zone. Light green indicates best signal quality, dark green good quality, black average quality and red the weakest signal quality.
By pressing Select Provider you can switch the operator and network so you can inspect base stations of other networks.
Put a tick into Record Data so that you measurements will be collected for uploading.
Send data to server
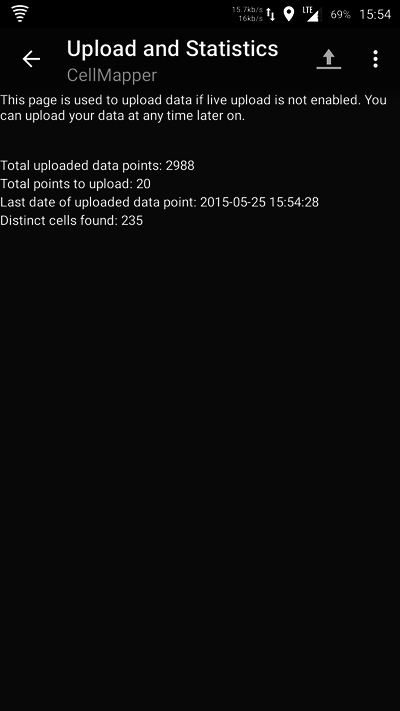
5. Upload your recorded data to the Cellmapper server by opening the Cell List tab and Upload and Statistics tab. You should always upload your newly measured base station so that somebody else won't have to go and redo it, and they can instead view it from the map. The cellmapper map is updated nearly instantaneously .
6. Press on the Upload icon after this and the data will be sent to the server. We recommend that you also turn on the Enable instant upload feature from the settings, so you don't have to press the button every time.
7. Close cellmapper after use so it won't drain your whole battery.
Resend data to server
Load the data to Cellmapper servers by selecting Upload and Statistics from the menu.
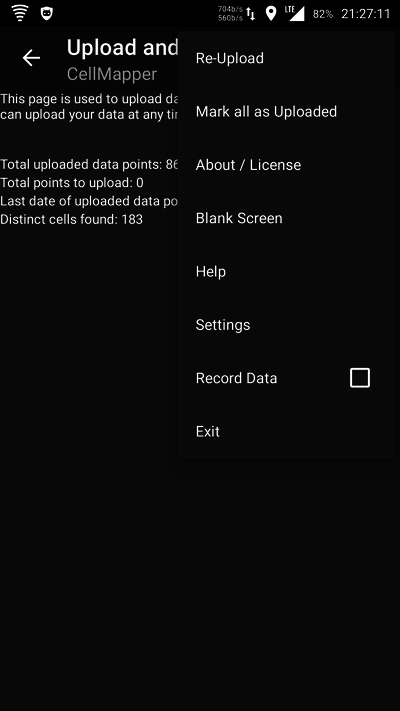
Open the menu and select Re-Upload.
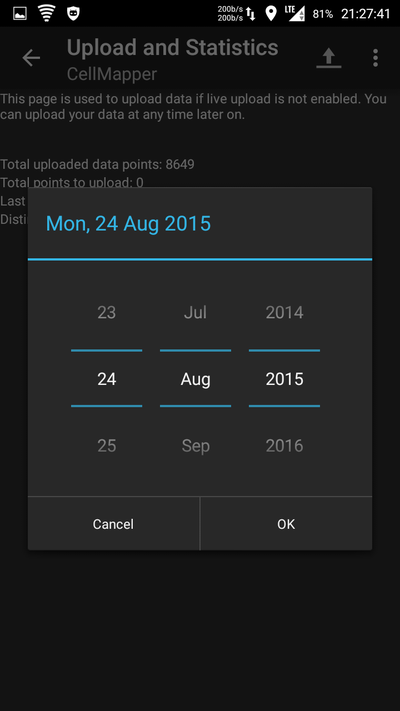
Select the starting date and time of which the data will be reuploaded.
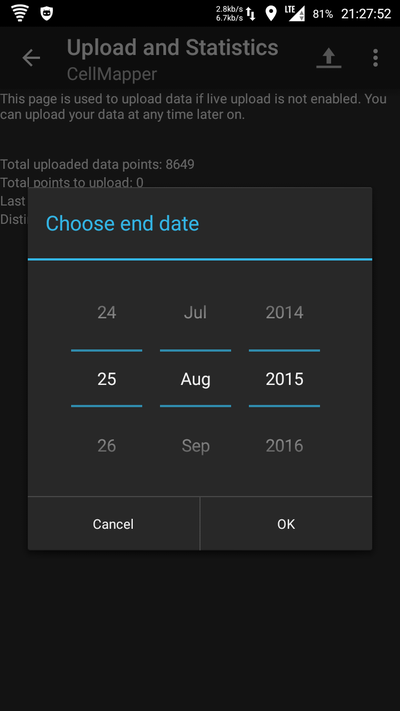
Select the end date and time of which the data will be reuploaded. Now when you press OK the phone will start to send data collected from between the starting and end date to the server, if an internet connection is available. Depending on the amount of data you have to send the process could take anything from a few seconds to a few minutes.
Settings
Automatic data upload
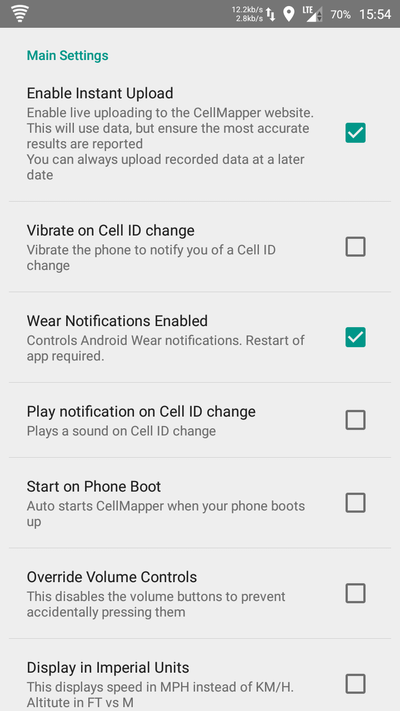
This enables the cellmapper application to automatically transmit data to the cellmapper servers that you have collected of a base station.
Open the application settings and put a tick in Enable Instant Upload.
Show base stations on the map
This function shows base stations on the map. By default this feature is enabled.
Show inaccurate base stations
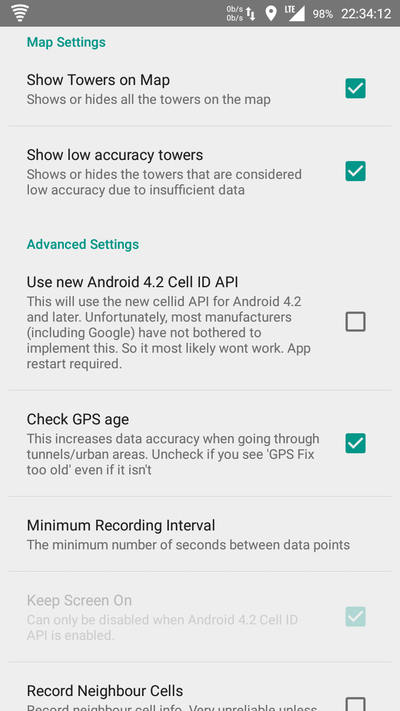
This feature shows inaccurately measured base stations on the map. Inaccurate base stations are stations which only have one cell or stations that have not been measured properly due to low signal values. You can improve the accuracy by measuring the station in closer proximity to it. Other overlapping base stations can also be inaccurately measured automatically as you are trying to measure some other station. You can also make a station accurate by manually locating it correctly on the map. This feature is disabled by default.
Android Cell ID API 4.2
This feature only works in Android 4.2 and Cell ID API 4.2 supported devices. Most manufacturers (such as Google) do no support this feature, so it is unlikely that your device will. Although, many new Samsung, LG and Sony devices support this feature. OnePlusOne gives incorrect information when measuring 3G, but the 2G and LTE network measuring works fine.
When you're using API 4.2 on your phone, wait a moment before beginning measurements. The phone will not immediately show correct data as the application is booted, but a short (2-10seconds) wait will correct this.
Check if your device supports this feature: https://www.cellmapper.net/mw/index.php/Android_4.2_CellID_Support
You can test the feature to see if it works correctly on your device. This requires restarting the application.
API 4.2 advantages:
- Enables turning off your screen during measuring
- Enables measuring and logging several cells at the same time from the same operator's network. This method can have some hiccups and bugs, so most stations measured this way will be shown as inaccurate base stations.
Check GPS age
This feature checks that your GPS information is fresh. We recommend enabling this.
Frequencies
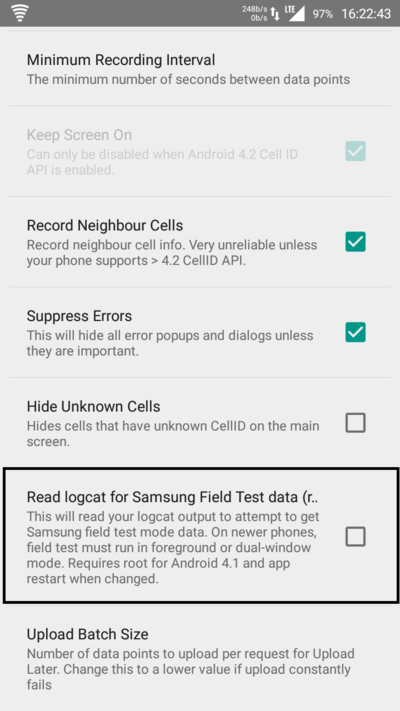
Cellmapper can measure the mobile network frequencies with the Samsung / Sony field test mode. This feature requires root privileges, so you need to root your phone if you wish to use this feature (NOTE! this removes any warranty on your phone.) After you have rooted your phone you go to Cellmapper's settings and enable Read logcat for Samsung/Sony Field Test Data. Sonera's and DNA's LTE frequencies are automatically updated on the browser map, so you won't need this feature if you are measuring their networks. Elisa's LTE is not able to do this, so they can only be measured with rooted Samsung/Sony devices. Support for this feature is also being developed for different devices. The feature will not work in custom roms. To test this you can "dial" *#0011# (samsung only) and that will show you the Band number. In Finland we mainly use LTE band 20 (800Mhz) and 3 (1800Mhz) and 7 in city areas (2600Mhz).
Instructions for Samsung devices:
- Ensure that your device is rooted and SuperSU is functional
- Enable Read logcat for Samsung/Sony Field Test data from Cellmapper's settings
- Close the application and reopen it
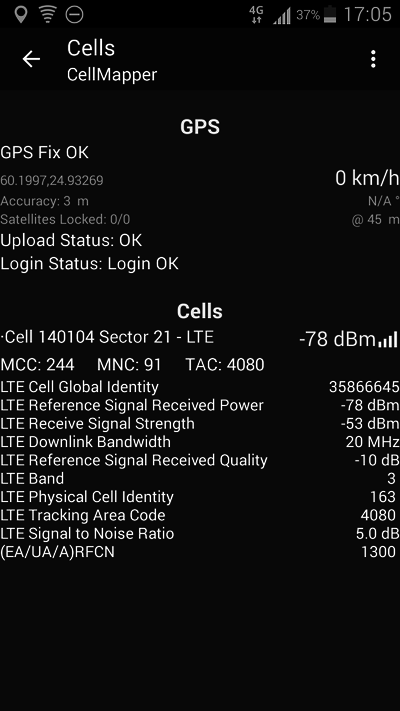
- When you open the Cellmapper application it will also open Service Mode. Do not shut this down! When measuring, the service mode must be shown on the screen (do not shutdown/lock your screen) or you can also use Dual Window mode. Otherwise service mode can't read the frequencies. If Service Mode does not open automatically, you can open it manually by dialing *#0011#. Frequency information will be shown for a short time when moving from Service Mode to Cellmapper's home view. When the frequency information dissappears, Cellmapper won't measure any more. Frequency information will be visible again once you enter Service Mode.
Below is the view from Cellmapper's main page when the application is reading Samsung ServiceMode's information.
Operator's LTE sectors and corresponding frequencies.
| Operator | Sector | Frequency | Other |
|---|---|---|---|
| DNA | 1, 2, 3 | 1800Mhz | |
| DNA | 10, 20, 30, 40 | 800Mhz | |
| Elisa | 1, 2, 3 | 800Mhz / 1800Mhz | |
| Elisa | 4, 5, 6 | 2600Mhz | |
| Sonera | 11, 21, 31 | 1800Mhz | |
| Sonera | 12, 22, 32 | 800Mhz | |
| Sonera | 10, 20, 30 | 2600Mhz | |
| Sonera and DNA | 13 | 800Mhz | Shared network |
| Sonera and DNA | 23, 33 | 1800Mhz | Shared network |
Users
Cellmapper collects information about your client device, for instance location, make and model, operator and other network information. You can view the precise list on cellmapper's website.
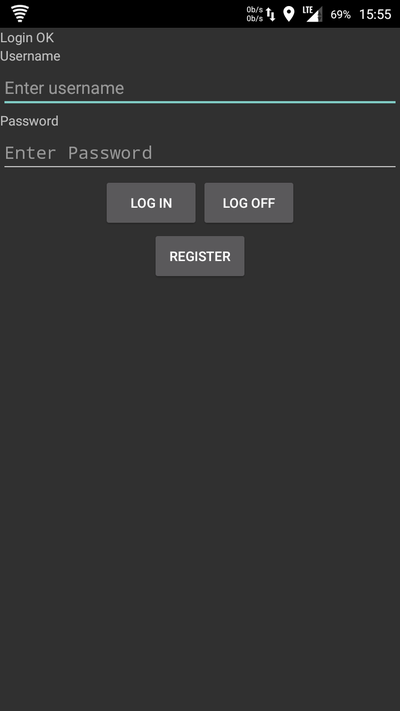
You can register an account for the cellmapper application and log in to it easily. Registering an account doesn't take much, just a username, e-mail and password. You can see your login state from Cells: Login OK .
Web browser map
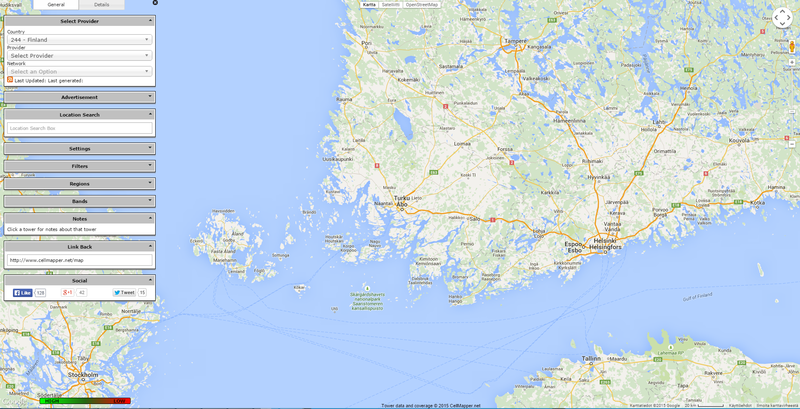
You can easily access the cellmapper web map using your browser at https://www.cellmapper.net/map
From the left you can select Country, Provider/Operator and Network.
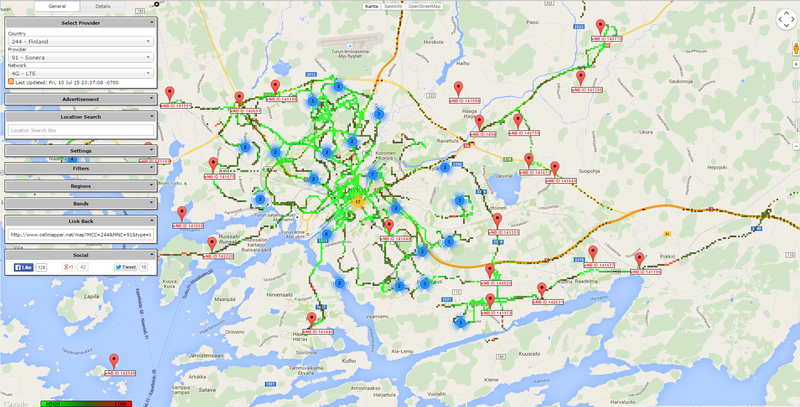
After filling those in the map will load already mapped stations found by your criteria. We selected Finland, Sonera and LTE and took a glance at the Turku map.
From the menu on the left you can select which frequencies are shown by clicking bands. This feature works only if the providers network allows measuring them, such as Sonera LTE and DNA LTE. You can also select Show low Accuracy Towers to see more base stations. These stations are either inaccurate and can only have one or two cells. Also weakly measured stations won't be shown without this filter, until they have been measured more accurately.
By the colours you can see the signal strength. Light green means good connection and dark green OK connection. Red means really shitty connection. If there's black it means there is no connection at all.
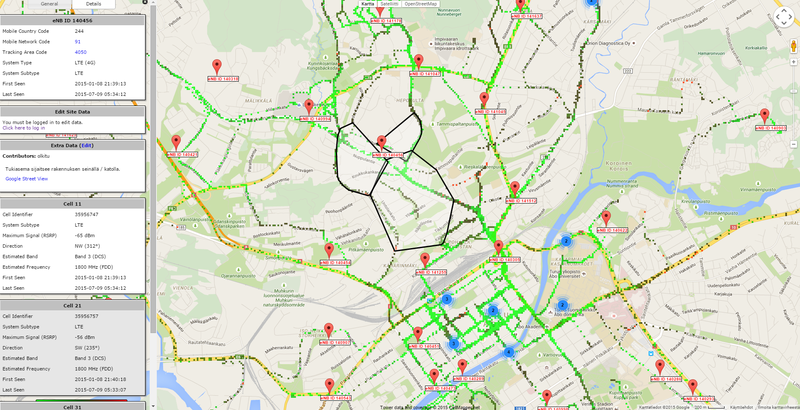
Click on a base station to get more information about it. On the left for instance you can see when it was first and last measured, the best signal established to a cell (RSPR) and the frequency, if available. Most commonly base stations have three cells which point off to different directions. If a base station is marked in the wrong place on the map and you know the correct and precise location, you can move the base station by logging in under Edit Site Data and pressing Click here to log in. Username and password are the same as in the cellmapper application, so this requires registration.
In Extra Data you can write more information about the base station in question or other things. You can also attach a picture of the station if you so desire. Credentials to do this should be sought out from the cellmapper community.
Moving and Removing base stations on the map
"Only for advanced users who understand how this works. Move only LTE base stations, don't move 2G/3G base stations! You can also message Taistowiki support and we can do this for you. Removing or moving base stations without knowledge on how this is done will only create more issues."
Log in to Cellmapper using your map credentials (not Cellmapper wiki or forum credentials) here. If you don't have the credentials, you can register here. If you have forgotten your password, you can reset it here.
Once you have successfully logged in, the page will inform you that the Login was successful. After this return to the map here.
Moving base stations has no sensible manual as of now, but just remember common sense while doing it as well as the following tips:
- From satellite imagery on services such as google maps try to locate the base stations in the vicinity.
- Take a look at the mast map http://testi.jles.me/mastot/ (this map only shows masts in Finland)
After this take a look at how the base station's cells cover. 800Mhz naturally covers a larger area than 1800Mhz, but the coverage will not be larger than 20km away. Watch out for "orphan cells", there could be incorrect data.
- Click the base station and look at it's coverage
- Look at the RSRP values, which are the maximums. The smallest is usually the most reliable one and also the direction of the cell.
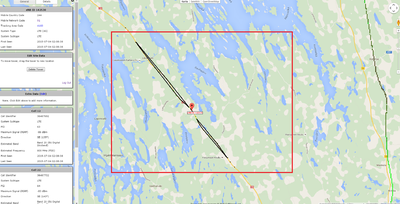
Example: To the South of Mikkeli there is the place Harjunmaa with the base station eNB ID 142530. Using Cellmapper some user has measured in the middle of highway 13, but we want to move it to the correct and accurate location.
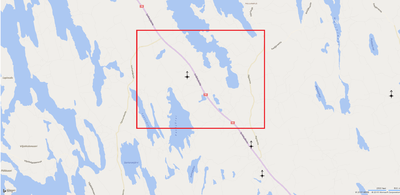
One route to take is to directly inspect satellite images of the area but it takes less effort to look at the mast map and see where in the area there are masts.
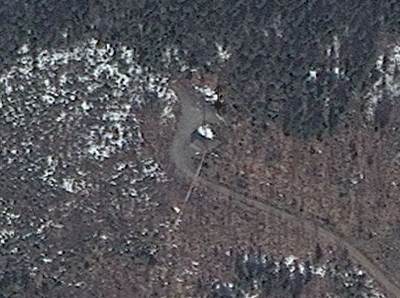
This particular case is easy since there is only one mast in the area so we can presume it is the mast in question. We recommend also using the satellite map so you can see what kind of terrain the area is made of. When we zoom in on the masts map and Cellmapper's map to the same location we can also clearly see the mast. We use the mouse and drag the mast location from the roadside to this location.
The page will ask you "Are you sure you would like to movie site 142530 to 61.866220238889255,26.98739254474674?". Confirm this action OK if the mast is on the right spot. Wait for a moment until you get the "Update Succesfull" message. If you encountered and error, try logging out and back in again. If you still encounter an error, clear your browser cookies and cache and then retry. Still can't do it? Contact support.
Now the base station has been moved and Cellmapper starts to generate the coverage area of the base station. This will take some time depending on how crowded the station is at the time.
Link to this area: http://www.cellmapper.net/map?MCC=244&MNC=91&type=LTE&latitude=61.86903288943261&longitude=26.993256093446345&zoom=15
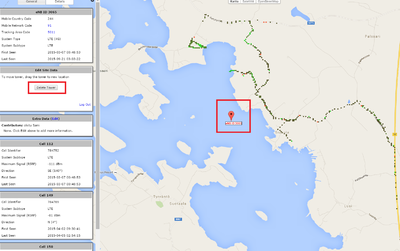
You can remove base stations with the Delete tower button. The base station will be hidden from the map but it will appear again if it is measured at a later time.
Here is an example of incorrect data, we recommend that only experienced Cellmapper users who can successfully identify incorrect data remove any stations.
